





WebSpots
網路補給站


在 Incus/HestiaCP 容器內取得 Cloudflare Tunnel 的真實客戶端 IP
文章分享:
問題描述
當使用 Incus 容器運行 HestiaCP,並透過 Cloudflare Tunnel (Cloudflared) 作為反向代理時,後端伺服器 (Apache) 預設只會看到來自 Incus 內部網路閘道器 (如 10.10.10.1) 的 IP。這會導致網站的訪問日誌 (access log) 無法記錄真實的外部瀏覽者 IP。
本文將指導您如何配置 cloudflared 和 Apache 的 mod_remoteip 模組,以解決這個常見問題。
Cloudflare Tunnel (Host 端) 配置:傳遞真實 IP
此步驟確保 Cloudflare Tunnel 在轉發請求時,將客戶端的真實 IP 放入特定的 HTTP 標頭 (Header) 中傳遞給容器。
編輯 cloudflared 配置檔案
在您的 Host 主機上,編輯 Cloudflare Tunnel 的 config.yml 檔案 (例如 ~/.cloudflared/config.yml)。
加入 setRequestHeader 指令
在對應的網站 (hostname) 規則下,確保 originRequest 區塊包含以下指令:
  # --- 範例:WordPress 規則 ---
  - hostname: your-wp.webspots.org
    service: http://10.10.10.50:80
    originRequest:
      noTLSVerify: true
      # 關鍵:將客戶端真實 IP 注入到 CF-Connecting-IP 標頭
      setRequestHeader:
        CF-Connecting-IP: "{clientIP}"
Apache (HestiaCP 容器內) 配置:讀取與紀錄 IP
此步驟需要修改 HestiaCP 容器內的 Apache 配置,啟用 mod_remoteip 模組,並告訴它讀取 Cloudflare 傳來的標頭,同時將信任範圍縮小至最低限度。
啟用 mod_remoteip 模組
進入 HestiaCP 容器並啟用模組:
incus exec HestiaCP -- a2enmod remoteip建立 HestiaCP Apache 範本APACHE2 自定義模板
為避免 HestiaCP 系統更新覆蓋配置,請複製預設模板並創建一個新的自定義模板 (例如 remoteip):
incus exec HestiaCP -- bash -c 'cp /usr/local/hestia/data/templates/web/apache2/php-fpm/default.tpl /usr/local/hestia/data/templates/web/apache2/php-fpm/remoteip.tpl'

incus exec HestiaCP -- bash -c 'cp /usr/local/hestia/data/templates/web/apache2/php-fpm/default.stpl /usr/local/hestia/data/templates/web/apache2/php-fpm/remoteip.stpl'
修改 remoteip.tpl 和 remoteip.stpl
編輯這兩個模板檔案,在 <VirtualHost> 區塊內新增或修改以下三組關鍵指令。
關鍵配置:
| 指令 | 目的 |
RemoteIPHeader CF-Connecting-IP | 告訴 Apache 應從哪個 Header 提取真實 IP。 |
RemoteIPInternalProxy 10.10.10.1 | 安全優化: 僅信任 Incus 網橋閘道器 IP,防止同網段容器偽造 Header。 |
LogFormat ... %a ... | 重新定義日誌格式,使用 %a (經 mod_remoteip 處理後的 IP) 替換 %h。 |
在模板中的修改範例 (新增部分):
<VirtualHost %ip%:%web_port%>
    # ... 其他 HestiaCP 變數 ...

   # --- START: Cloudflare Tunnel Remote IP 配置 ---
    RemoteIPHeader CF-Connecting-IP
    RemoteIPInternalProxy 10.10.10.0/24

   # --- Cloudflare Tunnel HTTPS 判斷 ---
    SetEnvIf X-Forwarded-Proto "^https$" HTTPS=on

   # 使用 %a 變數紀錄真實客戶端 IP
    LogFormat "%a %l %u %t \"%r\" %>s %b \"%{Referer}i\" \"%{User-agent}i\"" custom_remoteip

   # --- END: Cloudflare Tunnel Remote IP 配置 ---

    CustomLog /var/log/%web_system%/domains/%domain%.bytes bytes
   # 將預設的 combined 替換為 custom_remoteip
    CustomLog /var/log/%web_system%/domains/%domain%.log custom_remoteip
    ErrorLog /var/log/%web_system%/domains/%domain%.error.log

    # ...
</VirtualHost>
incus exec HestiaCP -- systemctl restart apache2套用自訂 remoteip 的模板
在 HestiaCP Container 內,使用 HestiaCP CLI 將此模板套用給您的網站:
# 將 USERNAME 替換為您的 HestiaCP 使用者名稱
v-change-web-domain-tpl USERNAME your-wp.webspots.org remoteip
或使用圖形介面更改
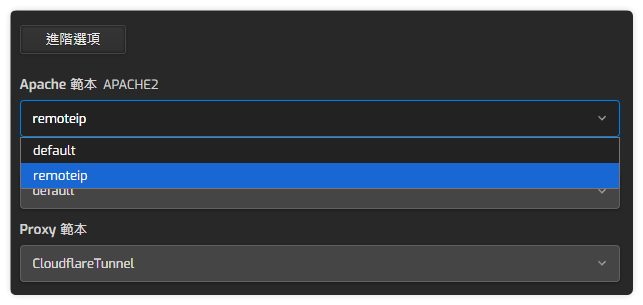
建立 HestiaCP Proxy 範本自定義模板
cp /usr/local/hestia/data/templates/web/nginx/default.tpl /usr/local/hestia/data/templates/web/nginx/CloudflareTunnel.tpl

cp /usr/local/hestia/data/templates/web/nginx/default.stpl /usr/local/hestia/data/templates/web/nginx/CloudflareTunnel.stpl
分別編輯 CloudflareTunnel.tpl 和 CloudflareTunnel.stpl 在 location / { 區段內加上如下內容
location / {
                proxy_pass http://%ip%:%web_port%;
                proxy_set_header Host $host;
                proxy_set_header X-Real-IP $http_cf_connecting_ip;
                proxy_set_header X-Forwarded-For $http_cf_connecting_ip;
                proxy_set_header CF-Connecting-IP $http_cf_connecting_ip;
                proxy_set_header X-Forwarded-Proto $scheme;
                proxy_set_header X-Forwarded-Host $host;
                proxy_set_header X-Forwarded-Port $server_port;
        }
套用自訂的 CloudflareTunnel 模板
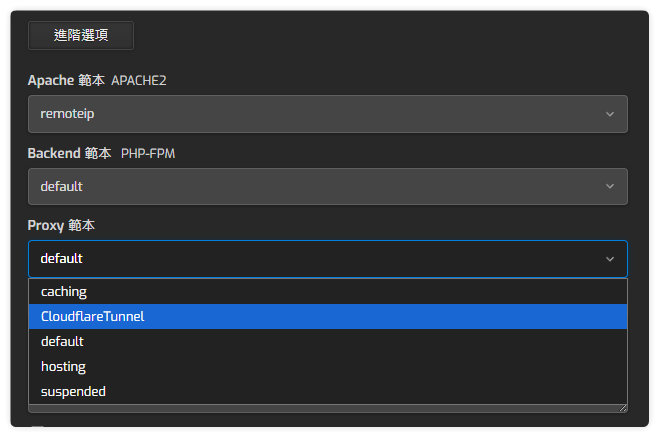
驗證結果
網頁根目錄 PHP 測試
於網頁根目錄新建立 test.php
<?php

header('Content-Type: text/plain');

var_dump([
    'HTTPS'                     => $_SERVER['HTTPS'] ?? null,
    'SERVER_PORT'               => $_SERVER['SERVER_PORT'] ?? null,
    'HTTP_X_FORWARDED_PROTO'    => $_SERVER['HTTP_X_FORWARDED_PROTO'] ?? null,
    'HTTP_CF_VISITOR'           => $_SERVER['HTTP_CF_VISITOR'] ?? null,
    'REMOTE_ADDR'               => $_SERVER['REMOTE_ADDR'] ?? null,
    'HTTP_HOST'                 => $_SERVER['HTTP_HOST'] ?? null,
    'REMOTE_ADDR'               => $_SERVER['REMOTE_ADDR'] ?? null,
    'HTTP_X_REAL_IP'            => $_SERVER['HTTP_X_REAL_IP'] ?? null,
    'HTTP_X_FORWARDED_FOR'      => $_SERVER['HTTP_X_FORWARDED_FOR'] ?? null,
    'HTTP_CF_CONNECTING_IP'     => $_SERVER['HTTP_CF_CONNECTING_IP'] ?? null,
    'HTTP_X_FORWARDED_PROTO'    => $_SERVER['HTTP_X_FORWARDED_PROTO'] ?? null,
]);
使用瀏覽器測試內容如下:
array(9) {
  ["HTTPS"]=>                   string(2) "on"
  ["SERVER_PORT"]=>             string(2) "80"
  ["HTTP_X_FORWARDED_PROTO"]=>  string(5) "https"
  ["HTTP_CF_VISITOR"]=>         string(18) "{"scheme":"https"}"
  ["REMOTE_ADDR"]=>             string(13) "Client IP"
  ["HTTP_HOST"]=>               string(18) "m6-wp.webspots.org"
  ["HTTP_X_REAL_IP"]=>          string(13) "Client IP"
  ["HTTP_X_FORWARDED_FOR"]=>    string(13) "Client IP"
  ["HTTP_CF_CONNECTING_IP"]=>   NULL
}
# 以下3個常數必須為 Client IP
# REMOTE_ADDR          = Client IP
# HTTP_X_REAL_IP       = Client IP
# HTTP_X_FORWARDED_FOR = Client IP
重新載入您的網站,然後檢查容器內的網站日誌檔案:
incus exec HestiaCP -- tail /var/log/apache2/domains/your-wp.webspots.org.log如果日誌顯示的是您的外部 IP (例如 220.133.x.xxx),而不是內部 IP (10.10.10.1),則配置成功!
HestiaCP 的 UI 介面修改截取 Client IP
編輯檔案 /usr/local/hestia/nginx/conf/nginx.conf
# 第 16、17 行附近
http {
	# 從 cloudflare tunnel 傳實際 Client ip 4-1
	map $remote_addr $hestia_client_ip {
               default   $remote_addr;
                # ip 為 ip-test.php 輸出 REMOTE_ADDR 的值
               20.0.0.2  $http_cf_connecting_ip;
            }

	# Main settings
	http2                         on;


# 第 183、184 行附近
location /fm/ {
			alias /usr/local/hestia/web/fm/dist/;
			index index.php;

			location ~ /([^/]+\.php)$ {
				try_files     /$1 =404;
				include       fastcgi_params;

				# 從 cloudflare tunnel 傳實際 Client ip 4-2
				fastcgi_param REMOTE_ADDR $hestia_client_ip;

				fastcgi_param HTTP_EARLY_DATA $rfc_early_data if_not_empty;
				fastcgi_param SCRIPT_FILENAME /usr/local/hestia/web/fm/dist/index.php;
				fastcgi_pass  unix:/run/hestia-php.sock;
				fastcgi_index index.php;
			}
		}

# 第 207、208 行附近
location ~ \.php$ {
			include                  fastcgi_params;

			# 從 cloudflare tunnel 傳實際 Client ip 4-3
			fastcgi_param 		 REMOTE_ADDR $hestia_client_ip;

			fastcgi_param            HTTP_EARLY_DATA $rfc_early_data if_not_empty;
			fastcgi_param            SCRIPT_FILENAME /usr/local/hestia/web/$fastcgi_script_name;
			fastcgi_pass             unix:/run/hestia-php.sock;
			fastcgi_intercept_errors on;
			break;
		}

# 第 66 行附近
	# 從 cloudflare tunnel 傳實際 Client ip 4-4
    # 主要是把 $remote_addr 改為 $hestia_client_ip
	log_format   main '$hestia_client_ip - $remote_user [$time_local] $request "$status" $body_bytes_sent "$http_referer" "$http_user_agent" "$http_x_forwarded_for"';
/usr/local/hestia/nginx/sbin/hestia-nginx -tkill -HUP "$(cat /run/hestia-nginx.pid)"tail -n 50 /var/log/hestia/auth.log# vim /usr/local/hestia/web/ip-test.php
# 用完刪除 rm -f /usr/local/hestia/web/ip-test.php
<?php
header('Content-Type: text/plain; charset=utf-8');
echo 'REMOTE_ADDR: ' . ($_SERVER['REMOTE_ADDR'] ?? '') . PHP_EOL;
echo 'HTTP_CF_CONNECTING_IP: ' . ($_SERVER['HTTP_CF_CONNECTING_IP'] ?? '') . PHP_EOL;
echo 'HTTP_X_FORWARDED_FOR: ' . ($_SERVER['HTTP_X_FORWARDED_FOR'] ?? '') . PHP_EOL;
echo 'HTTP_X_REAL_IP: ' . ($_SERVER['HTTP_X_REAL_IP'] ?? '') . PHP_EOL;
# 測試方式瀏覽器打開 https://your-hcp.domain.com確認 HestiaCP auth.log
tail -f /var/log/hestia/auth.log確認 Hestia Nginx access.log
tail -f /var/log/hestia/nginx-access.log